Magento After Creating Configurable Product and Edit It
Configurable Product
A configurable production looks like a single product with driblet-down lists of options for each variation. Each option is really a divide simple product with a unique SKU, which makes it possible to track inventory for each product variation. You could attain a similar effect by using a simple product with custom options, only without the power to rail inventory for each variation.
The following instructions demonstrate the process of creating a configurable product using a product template, required fields, and bones settings. Each required field is marked with a red asterisk (*). When you lot terminate the basics, y'all can complete the advanced settings and other settings as needed.
 Configurable product
Part 1: Creating a configurable product
Although a configurable product uses more than SKUs and may initially take a lilliputian longer to set up, it tin can save you lot time in the long run. If you lot plan to grow your business concern, the configurable production type is a adept selection for products with multiple options.
Before yous begin, fix an attribute prepare that includes an aspect that is set to one of the allowable input types for each production variation. For example, the attribute ready might include drop-downwardly attributes for colour and size.
The properties of each attribute that is used for a configurable product variation must have the following settings:
Product variation attribute requirements
| Holding | Setting |
|---|---|
| Scope | Global |
| Catalog Input Blazon for Store Possessor | The input type of any attribute that is used for a product variation must be one of the following: Dropdown, Visual Swatch, or Text Swatch. |
| Values Required | Yes |
Step one: Choose the production blazon
-
On the Admin sidebar, go to Itemize > Products.
-
On the Add Product (
 ) card at the upper-right corner, choose Configurable Product.
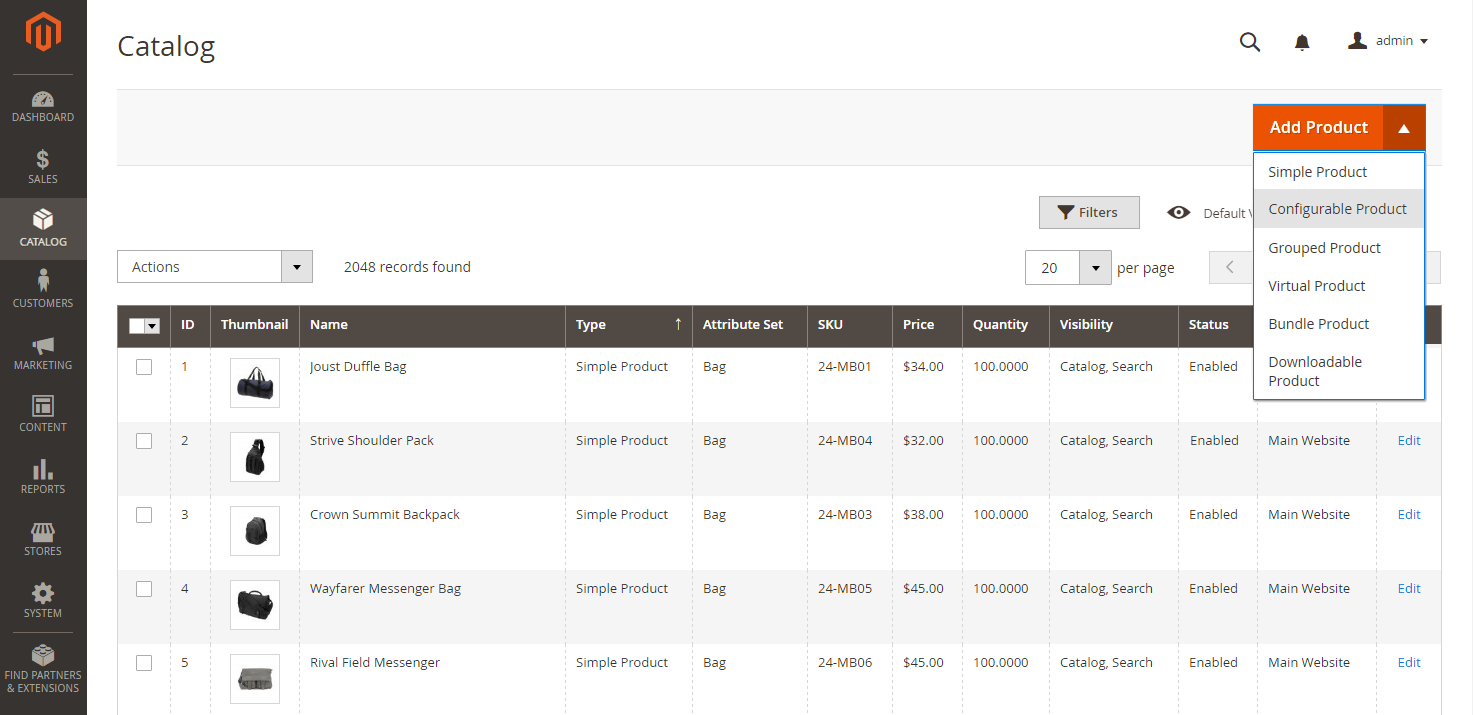 Add configurable production
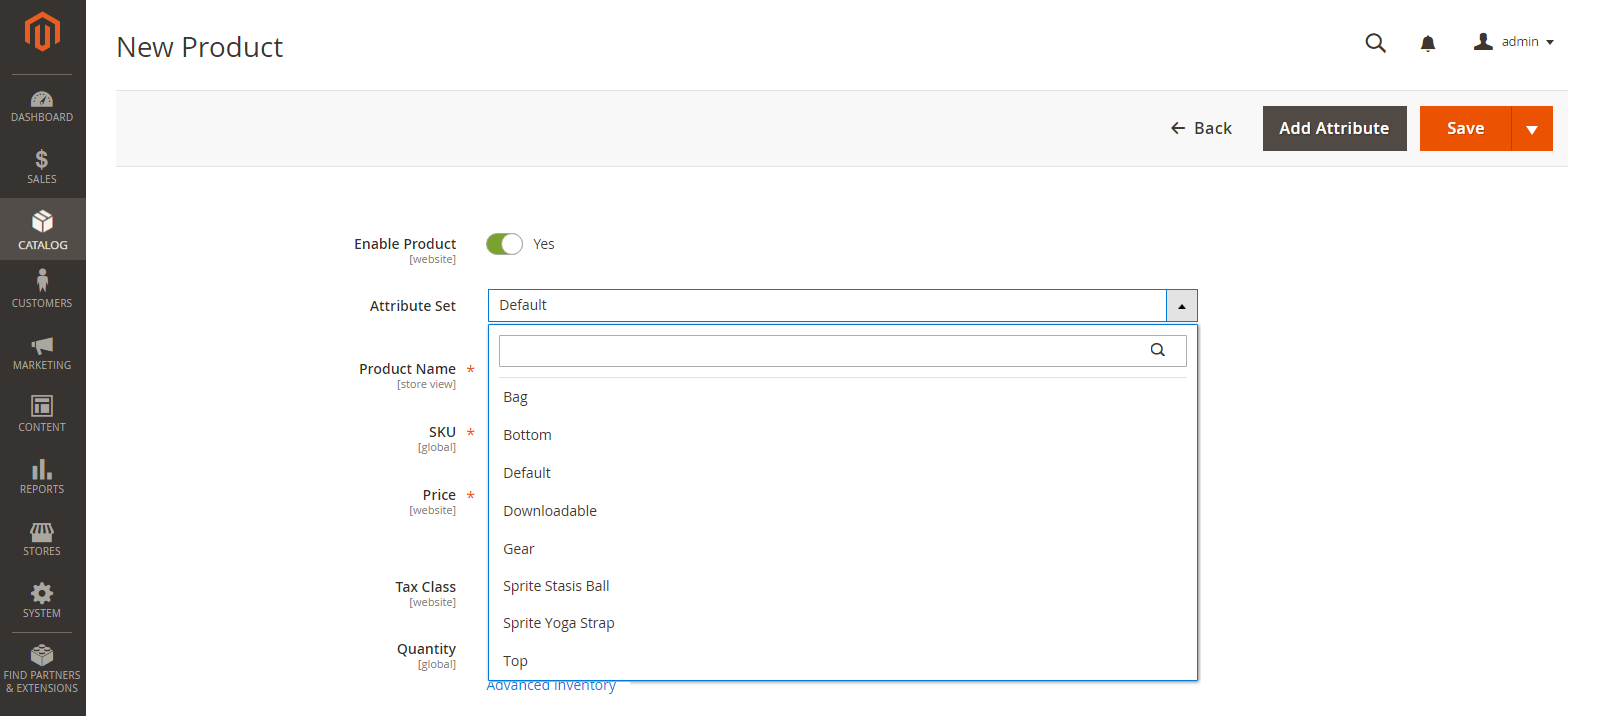
Stride 2: Cull the attribute set up
The attribute set determines the selection of fields that are used in the production. The attribute set that is used in the post-obit example has attributes for colour and size. The name of the attribute set is indicated at the top of the page and is initially set to Default.
-
To choose the attribute ready for the product, click the field at the pinnacle of the page and do one of the following:
- For Search, enter the name of the attribute gear up.
- In the list, choose the attribute set that you want to use.
The course is updated to reverberate the modify.
-
If you need to add an boosted aspect to the aspect ready, click Add Attribute and follow the instructions in Calculation an Attribute.
 Cull template
Stride 3: Complete the required settings
-
Enter the product Product Proper noun.
-
Take the default SKU that is based on the production name or enter another.
-
Enter the product Price.
-
Because the production is not yet ready to publish, prepare Enable Product to
No. -
Click Salve and continue.
When the product is saved, the Store View chooser appears in the upper-left corner.
-
Choose the Store View where the production is to exist available.
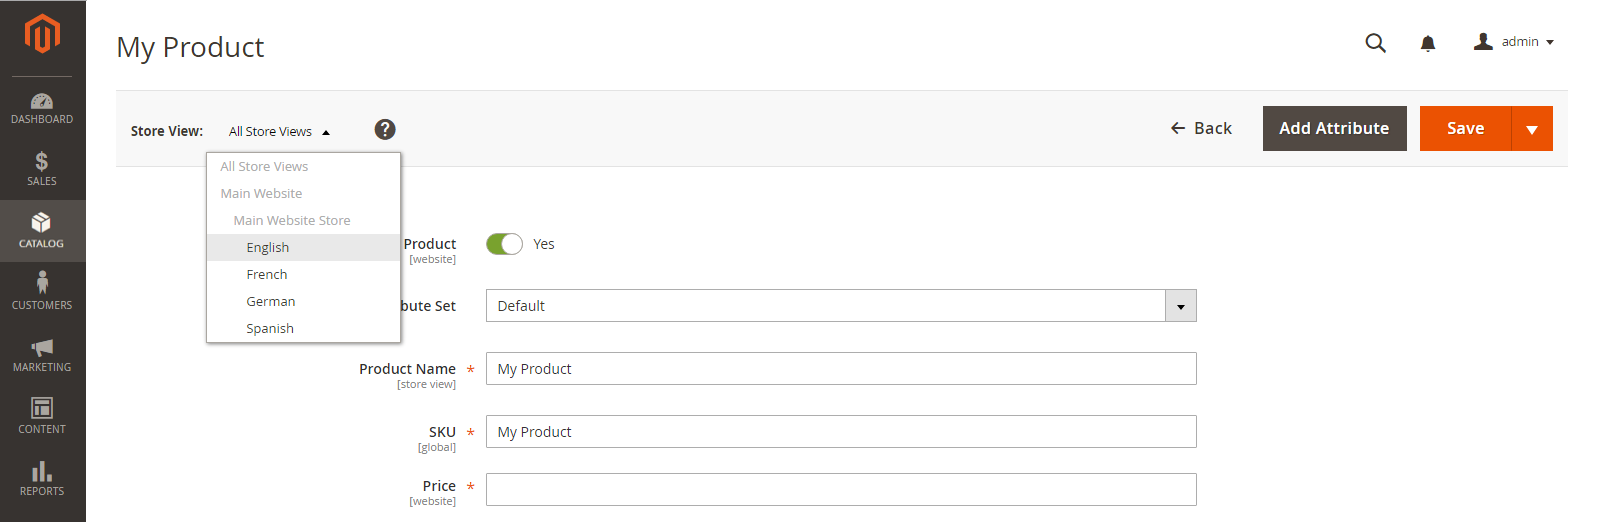 Choose the store view
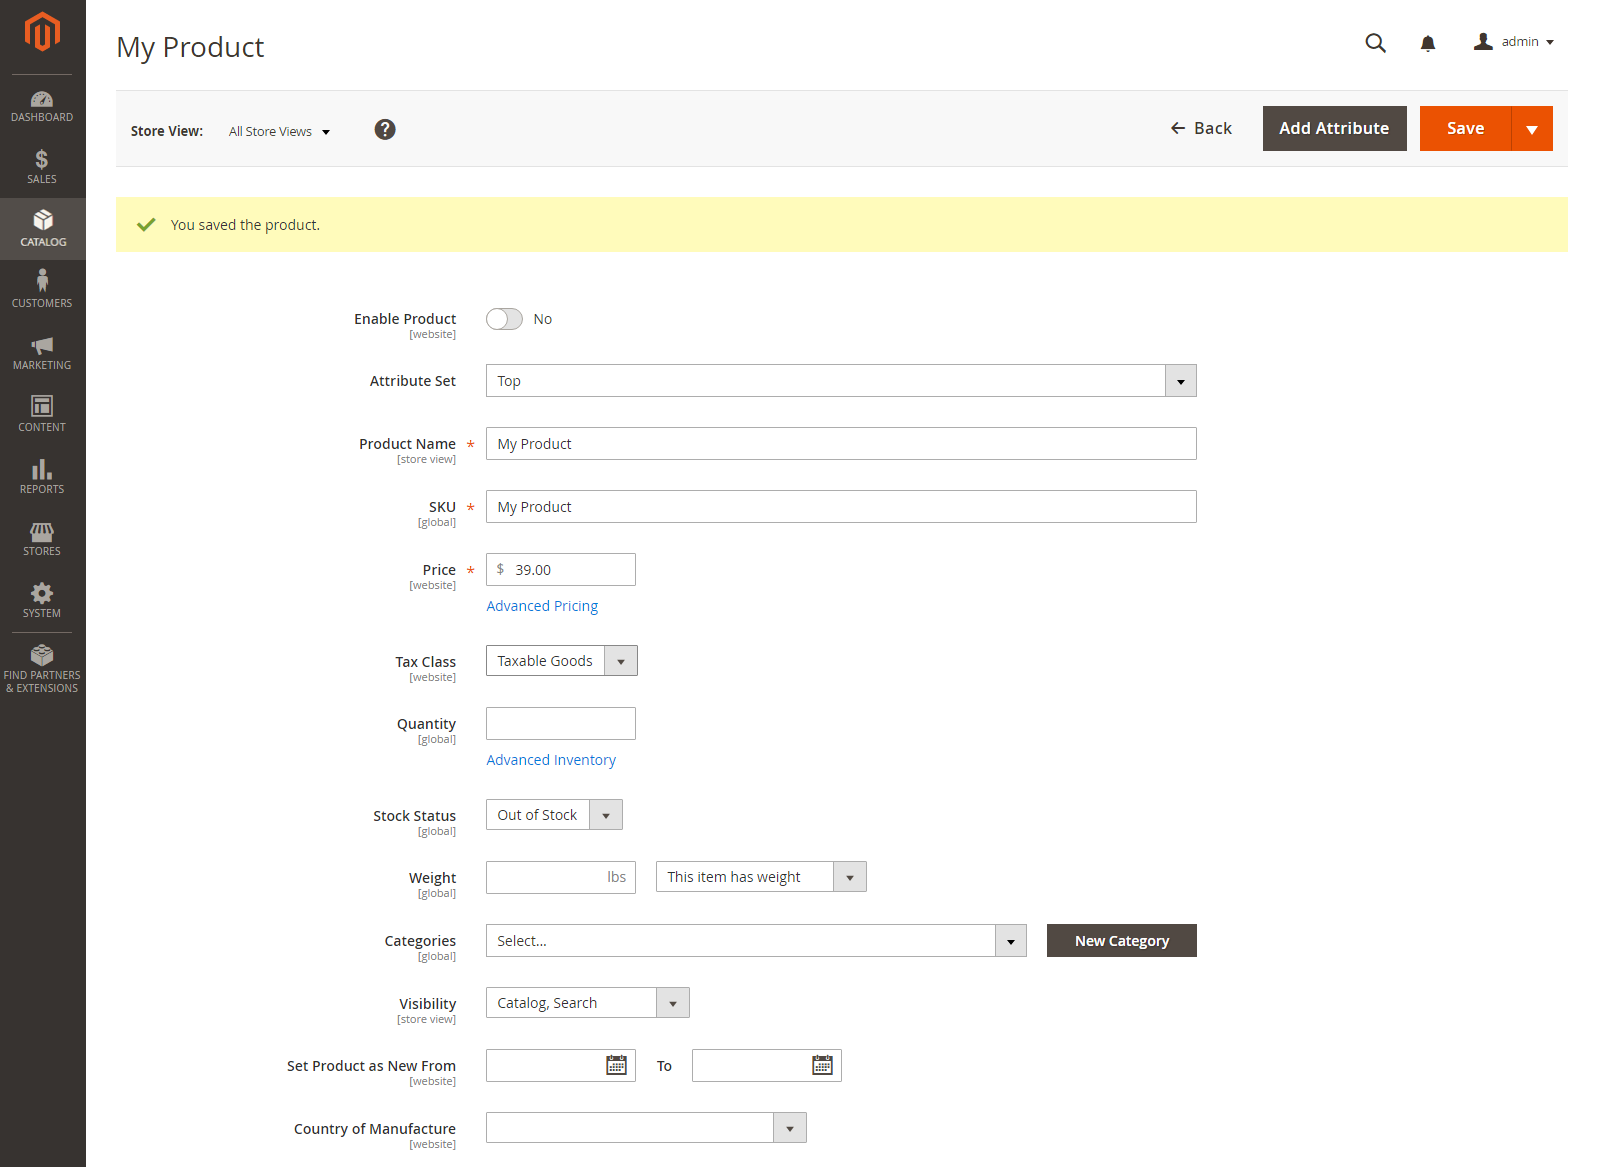
Step 4: Complete the bones settings
-
Gear up Tax Class to ane of the post-obit:
-
None -
Taxable Goods
-
-
The Quantity is determined by the product variations, and then you can leave information technology blank.
-
Leave the Stock Condition as set.
The Stock Status of a configurable production is determined by each associated configuration. Because the product was saved without entering a quantity, the Stock Status is ready to
Out of Stock. -
Enter the production Weight.
A configurable product must always have a weight. If you select This particular has no weight from the drop-downwardly list, information technology is automatically changed to This detail has weight after saving the product.
-
Have the default Visibility setting of
Catalog, Search. -
To feature the product in the list of new products, select the Fix Product equally New checkbox.
-
To assign Categories to the product, click the Select… box and do either of the following:
-
Cull an existing category:
-
Starting time typing in the box to discover a lucifer.
-
Select the checkbox of the category that is to be assigned.
-
-
Create a new category:
-
Click New Category.
-
Enter the Category Name and cull the Parent Category to determine its position in the bill of fare structure.
-
Click Create Category.
-
-
-
Cull the Land of Manufacture.
 Product Details
 At that place might be additional attributes that are used to describe the product. The selection varies by attribute set, and you tin complete them later.
Step 5: Save and continue
This is a skillful fourth dimension to salve your work. In the upper-right corner, click Save. In the next series of steps, you'll set up the configurations for each variation of the product.
Part 2: Adding configurations
The post-obit example shows how to add together configurations for three colors and three sizes. In all, nine uncomplicated products will be created with unique SKUs to embrace every possible combination of variations. Past default, the product proper noun and SKU for each variation is based on the attribute value and either the parent product proper noun or SKU.
The progress bar at the top of the folio shows where yous are in the process and guides yous through each step.
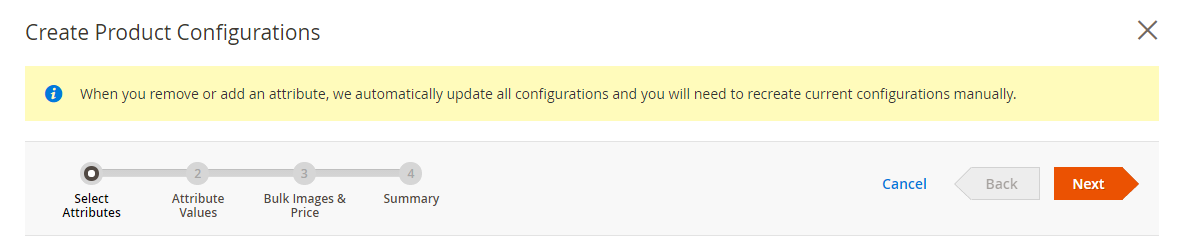 Progress bar
Pace 1: Choose the attributes
-
Continuing from above, ringlet downwardly to the Configurations section and click Create Configurations.
 Configurations
 -
Select the checkbox of each attribute that yous want to include equally a configuration.
For this case, nosotros choose
colorandsize. -
The listing includes all attributes from the aspect prepare that can be used in a configurable product.
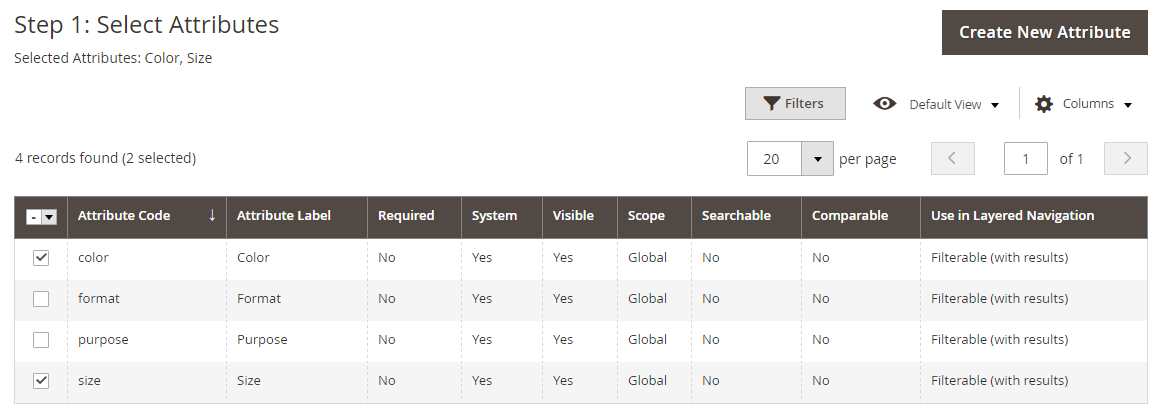 Select Attributes
 -
If you lot need to add a new attribute, click Create New Attribute and do the post-obit:
-
Complete the attribute backdrop.
-
Click Relieve Attribute.
-
Select the checkbox to select the aspect.
-
-
In the upper-right corner, click Next.
Step 2: Enter the attribute values
-
For each attribute, select the checkbox of the values that employ to the product.
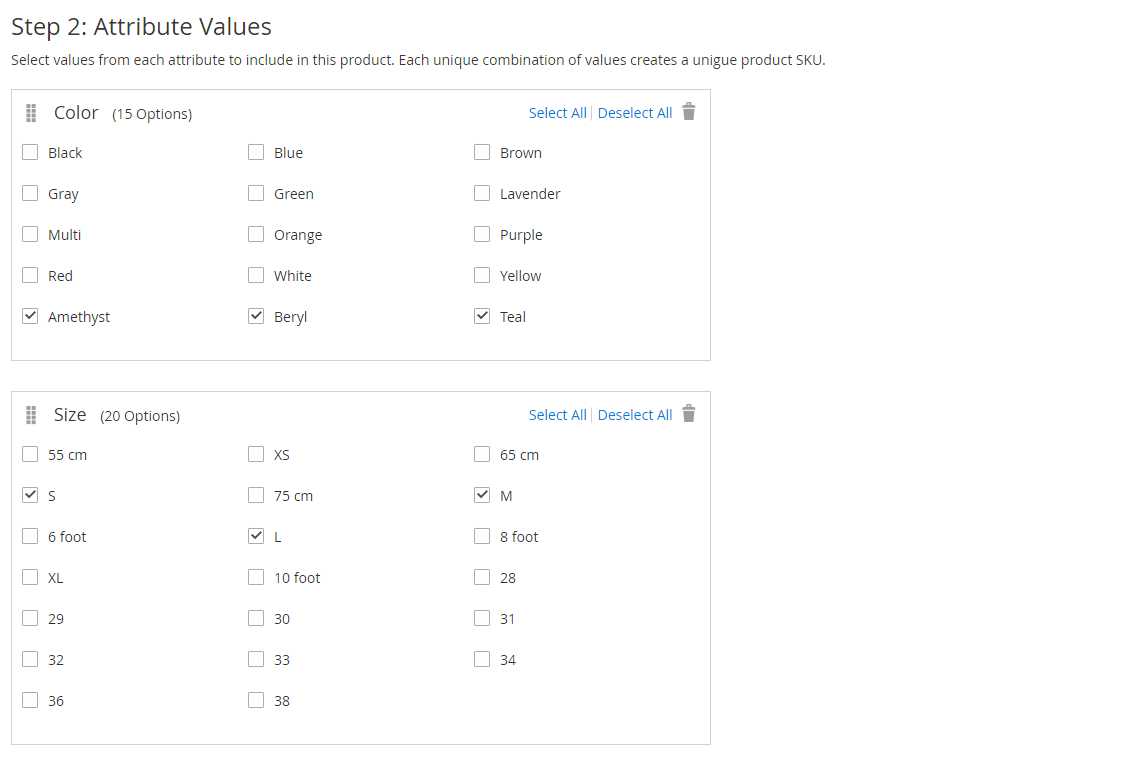
-
To rearrange the attributes, grab the Change Club (
 ) icon and move the section to a new position.
The order determines the position of the drib-downwardly lists on the production folio.
-
In the progress bar, click Next.
Step three: Configure the images, price, and quantity
This pace determines the images, pricing, and quantity of each configuration. The available options are the aforementioned for each, and you lot can choose merely 1. You can apply the same setting to all SKUs, apply a unique setting to each SKU, or skip the settings for now.
Choose the configuration options that apply.
Utilize one of the following methods to configure the images:
-
Method i: Apply a single set of images to all SKUs
-
Select Employ single ready of images to all SKUs.
-
Scan to each epitome that you want to include in the product gallery, or drag them to the box.
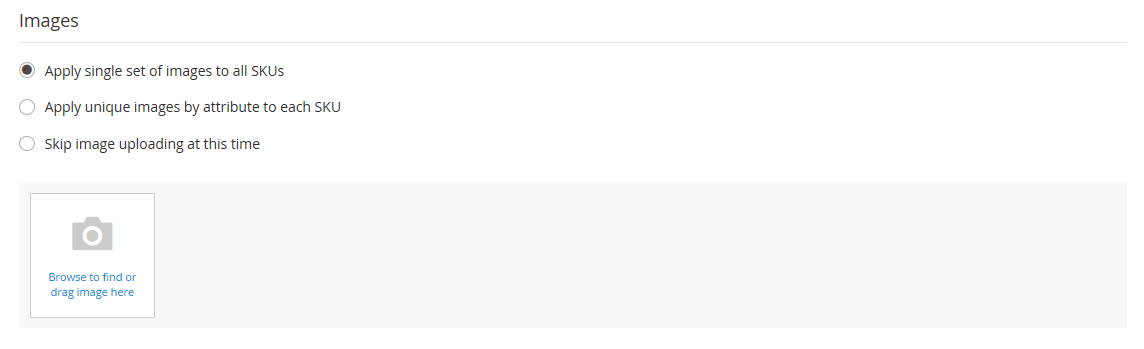 Use same images for all SKUs
 -
-
Method 2: Use unique images for each SKU
Because nosotros already uploaded an paradigm for the parent production, we'll use this pick to upload an image of each color. This is the image that will appear in the shopping cart when someone buys the shirt in a specific color.
-
Select Employ unique images by attribute to each SKU.
-
Select the aspect that the images illustrate, such every bit
color. -
For each attribute value, either browse to the images that you want to use for that configuration or drag them to the box.
If you drag the an epitome to a value box, it likewise appears in the sections for the other values. If you want to delete an image, click the trashcan (
 ) icon.
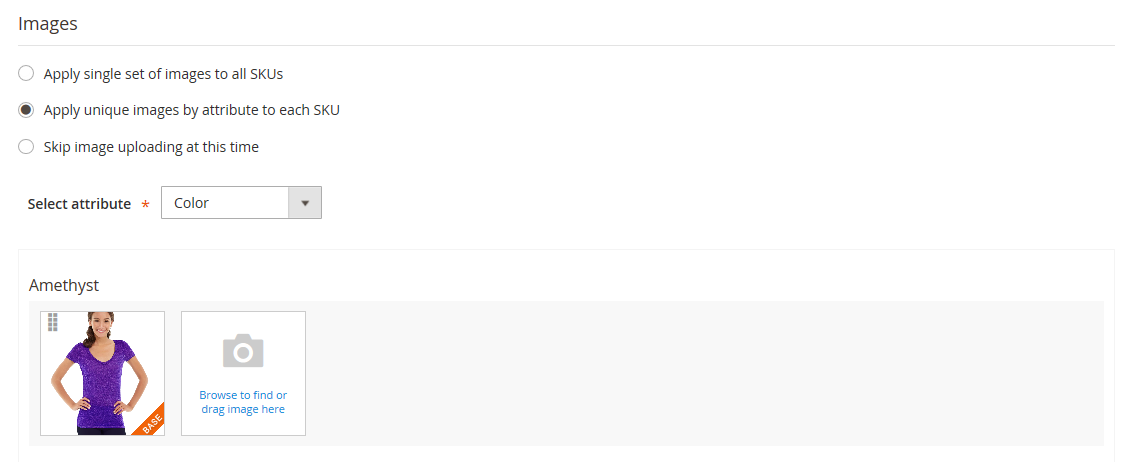 Unique images per SKU
-
Use one of the following methods to configure the prices:
- Method 1: Utilise the aforementioned cost to all SKUs
-
If the price is the same for all variations, select Apply unmarried price to all SKUs.
-
Enter the Price.
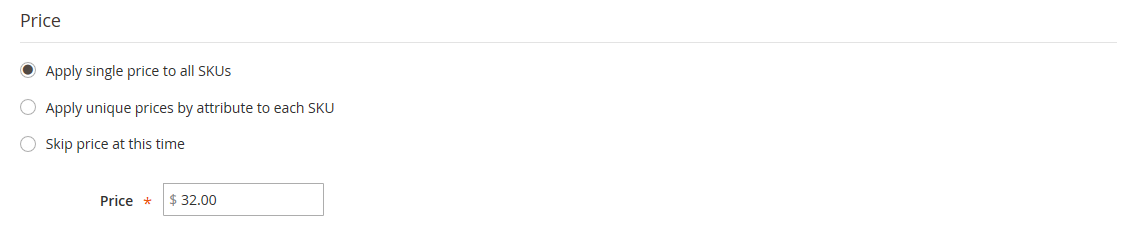 Same price per SKU
- Method 2: Utilize a unlike price for each SKU
-
If the price differs for each or for some variations of the product, select Apply unique prices by attribute to each SKU.
-
Select the attribute that is the ground of the toll difference.
-
Enter the cost for each attribute value.
In this example, the Forty size costs more than.
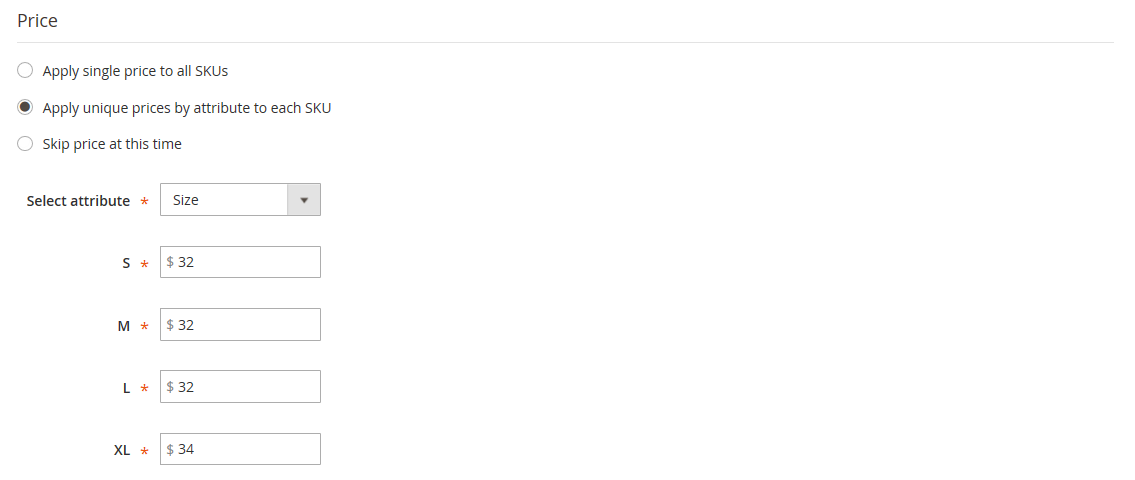 Unique price per SKU
Use one of the following methods to configure the quantity:
- Method 1: Apply the same quantity to all SKUs
-
If the quantity is the same for all SKUs, select Apply unmarried quantity to each SKU.
-
Enter the Quantity.
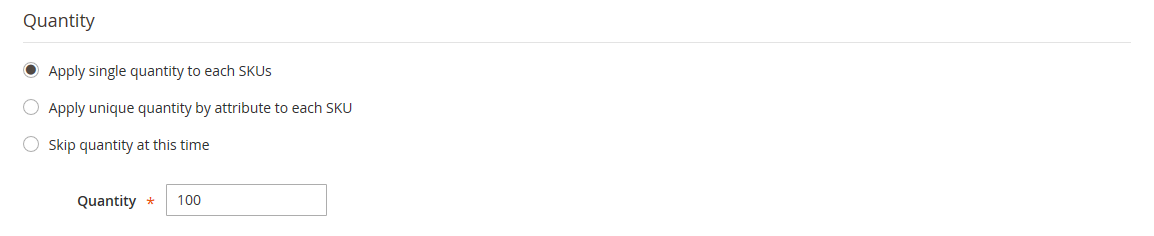 Same Quantity for All SKUs
 -
If needed, utilise the Same Quantity to All SKUs (Inventory Management).
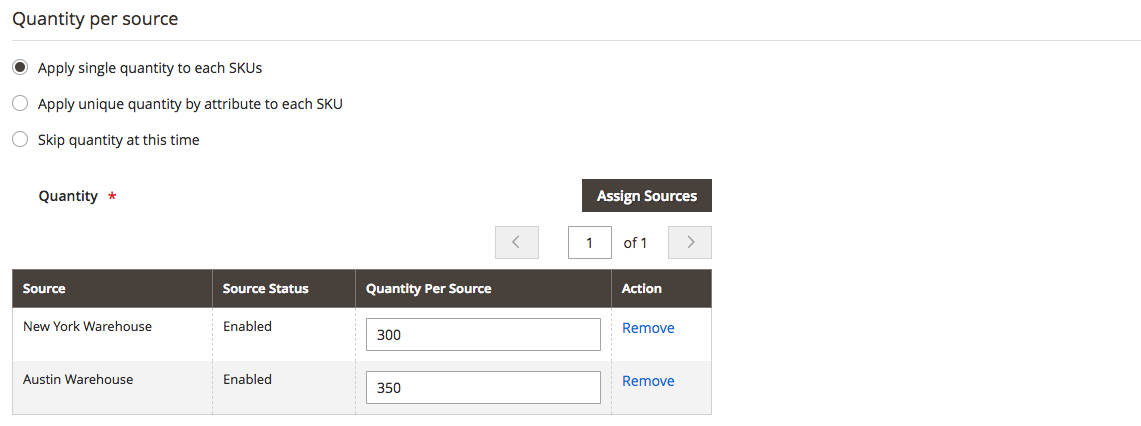
For Multi Source merchants using Inventory Direction, assign sources and add quantities for all generated product variants:
-
Select the Utilize single quantity to each SKUs option.
-
To add a source, click Assign Sources.
-
Browse or search for a source you want to add. Select the checkbox next to the source(s) you desire to add for the product.
-
Enter an on-paw inventory amount per source.
 Aforementioned Quantity for All SKUs
 -
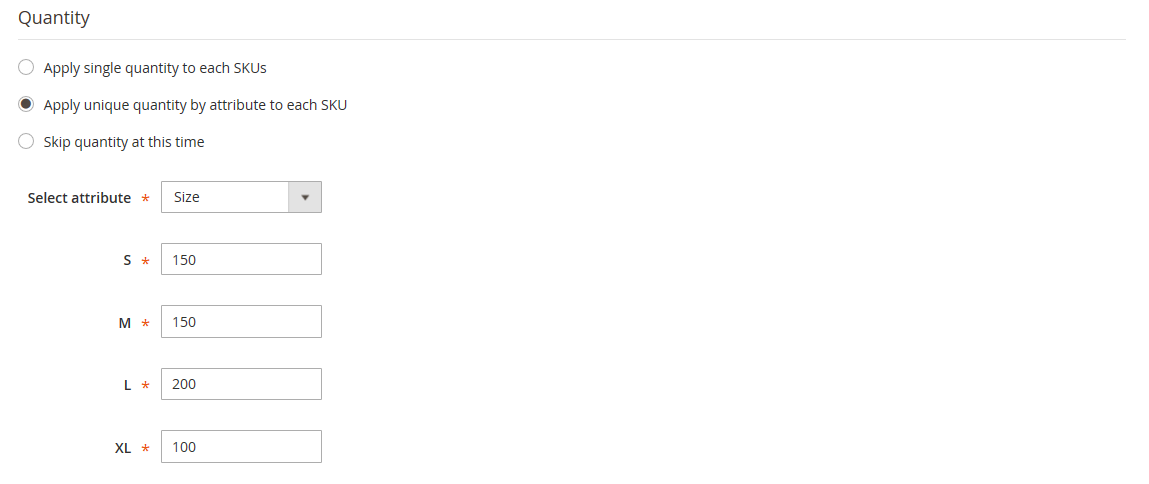
- Method 2: Utilize Different Quantity by Attribute
-
If the quantity is the dissimilar for each SKU, select Apply unique quantity by attribute to each SKU.
-
Enter the Quantity for each.
 Different quantities per attribute
When configuration for images, cost, and quantity are complete, click Next in the upper-right corner.
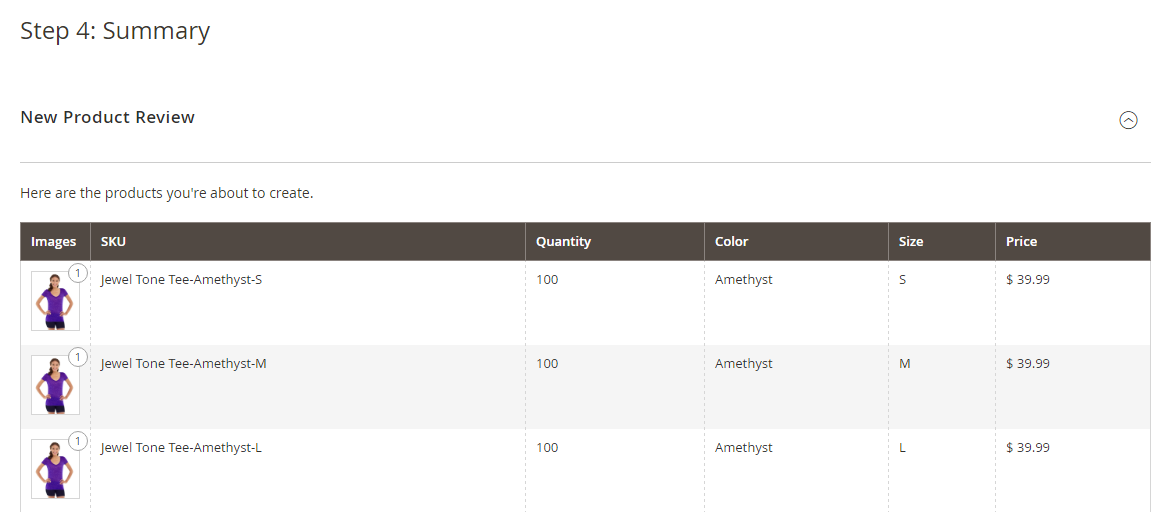
Footstep 4: Generate the product configurations
Look a moment for the list of products to appear and exercise one of the post-obit:
-
If you are satisfied with the configurations, click Next.
-
To make corrections, click Back.
The current product variations appear at the bottom of the Configuration section.
 Electric current Configurations
Step 5: Add a production image
-
Scroll down and expand
 the Images and Videos section.
 -
Click the Camera tile and browse to the chief image that y'all want to utilize for the configurable product.
For more than information, see Images and Video.
Step 6: Complete the production information
Scroll down and complete the data in the following sections as needed:
-
Content
-
Related Products, Up-Sells, and Cantankerous-Sells
-
Search Engine Optimization
-
Customizable Options
-
Products in Websites
-
Design
-
Gift Options
Pace 7: Publish the production
-
If yous are ready to publish the product in the itemize, set Enable Product to
Ayeand do one of the following:-
Method ane: Relieve and preview
-
In the upper-right corner, click Save.
-
To view the product in your store, cull Customer View on the Admin (
 ) menu.
The store opens in a new browser tab.
 Customer View
 -
-
Method 2: Save and close
On the Save (
) carte, choose Salve & Close.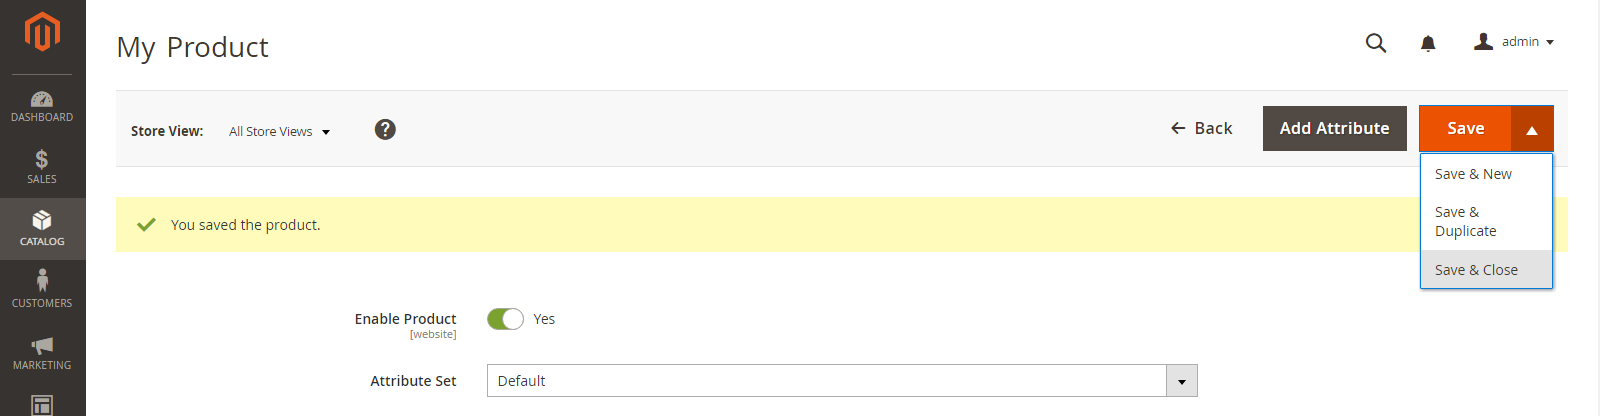 Save & Shut
-
Pace 8: Configure the cart thumbnails
If yous have a dissimilar paradigm for each variation y'all tin can ready the configuration to utilise the right epitome for the shopping cart thumbnail.
-
On the Admin sidebar, go to Stores > Settings > Configuration.
-
In the left panel, expand Sales and choose Checkout underneath.
-
Expand
the Shopping Cart section. -
Ready Configurable Product Paradigm to
Product Thumbnail Itself. -
When complete, click Save Config.
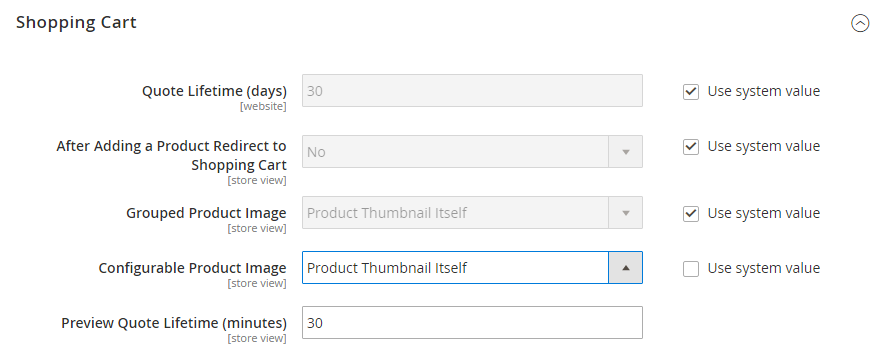 Shopping cart - configurable product image
Things to remember
-
A configurable product allows the shopper to cull options from drop-downwardly, multiple select, visual swatch and text swatch input types. Each option is a separate, unproblematic product.
-
Configurable kid products can exist simple or virtual products without custom options. To make custom child products virtual, yous must select Тhis item has no weight in the Weight setting for each of them.
-
The attributes that are used for product variations must have a global scope and the customer must exist required to choose a value. The production variation attributes must be included in the aspect fix that is used equally a template for the configurable product.
-
The aspect prepare that is used as a template for a configurable product must include the aspect(south) that comprise the values that are needed for each product variation.
-
The thumbnail paradigm in the shopping cart can be set to display the epitome from the configurable product record or from the product variation.
-
Swatch attributes can be configured to not display respective simple production images when the swatch is selected by setting the "Update Production Preview Prototype" option value to "No" at the aspect edit page in the admin.
-
The theme controls how the Prototype Gallery behaves when a user switches betwixt product configurations. The default behavior for the Blank theme is to override the parent configurable product images with the selected product variation. For the Luma theme, the default behavior is to prepend the selected product variation images to the parent configurable product images.
Source: https://docs.magento.com/user-guide/catalog/product-create-configurable.html
0 Response to "Magento After Creating Configurable Product and Edit It"
Post a Comment